

Normally, when we discuss home-defense firearms, images of shotguns and handguns will quickly come to mind. Both have their place in the defensive armory, but they have drawbacks. Shotguns typically have limited capacity, are slow to reload and the recoil of a 12 gauge can be brutal. Handguns may improve capacity and are quicker to reload, but the power of a handgun round is limited.
There is another selection you could make for a home defense weapon: a semi-automatic carbine. Strong points in the carbine’s favor are overall power, extended capacity and rapid reloading. By far, the AR-15 is the number-one carbine in the country and is so popular that most shooters simple refer to it as the “AR.” A lightweight AR-15 is easily handled by men and women alike. Capacity generally ranges from 10 to 30 rounds, and reloading takes just a few seconds.
To continue the concept of an AR-15 as your home-defense firearm, I’ll go a step further and point out that you have three general methods of getting an AR-15 that is configured exactly to your desires. First, you might find a carbine that comes from the factory in the exact configuration you want—so just buy it. Second, you might find one that’s fairly close to what you want, which you can then modify slightly. The third choice is to build your AR-15 from the ground up. There is no rocket science involved in building an AR, and doing so will increase your understanding of the function of every part of the rifle.
Planning the Project
The most important part of building an AR-15 is the planning stage. You will need to visualize the finished rifle and make a list of every component you need to order. The advantage of this approach is you’re not paying for the parts that you are going to then upgrade in a factory rifle. Many sources of information on how to assemble both the upper and lower receivers are available (including in the pages of Shooting Illustrated and on ShootingIllustrated.com). You will quickly realize that not all information is created equal. Pick a few sources that give you the best guidance and are enjoyable to read or watch. Even as a writer, I must admit that a good DIY video can give you much more detail than I could ever do with the written word. What I’ll do here is review some of the parts I have personally chosen and explain why I made these selections.
The Cartridge
Once you start your planning, the first aspect you will have to decide is what cartridge to use and what loads are available for that cartridge. Thankfully, not all AR-15s are chambered in 5.56 NATO. While I am a major fan of the AR-15, I have always considered the 5.56 NATO to be a subpar cartridge for anything other than varmints. I’m sure many will disagree with my last statement, and that’s the beauty—they can still build their own rifle in 5.56 NATO. It just isn’t my favorite. Fortunately, the AR-15 can also be chambered in many other cartridges that you may want to consider.
Due to excessive recoil and a significant decrease in capacity, I have set aside considering the large-bore chamberings such as the .458 SOCOM or .450 Bushmaster. These cartridges will have a high level of recoil and extremely limited magazine capacity owing to their size.
Of the remaining options, I think the best to choose from are the .300 BLK, .300 HAMR, 6.8 SPC and 6.5 Grendel. If I was trying to go with a suppressed subsonic round, the .300 BLK would be a definite consideration. But, factoring in the $200 tax stamp, the extended wait for approval and the price tag of a quality suppressor, this could significantly increase the cost of our project. When using a supersonic load, .300 BLK comes in last for velocity and muzzle energy, and twist rates for its barrels are often designed for heavy projectiles at subsonic velocities. This can result in less-than-desirable accuracy with the more useful 110- to 130-grain bullets at supersonic speeds.
When comparing the .300 HAMR, 6.8 SPC and 6.5 Grendel, the spread of muzzle velocity and energy levels become closer. Of the three choices, the .300 HAMR does have an advantage, but I should mention that the 6.5 Grendel closes the gap as your range extends past 200 yards. Since nearly all defensive situations will be well inside of 200 yards, I have adopted the .300 HAMR as my chosen cartridge. To support my choice even further, the barrel is the only part that varies from the original design of the AR-15. You can take a standard AR-15, change the barrel and then you have a .300 HAMR. Since .300 HAMR is formed from the original 5.56 NATO cartridge case, the bolt face is the same. Like many shooters, I strongly prefer .30-caliber projectiles to those of the 6.5 and 6.8 calibers.
Your Chosen Loads
Currently, there are more than 30 projectiles suitable for .300 HAMR, and I have tested most of them between 110 grains to 150 grains. Of all these choices, I have about five loads to concentrate on for further testing. The .300 HAMR has several loads with velocity in the 2,500 to 2,600 fps range, with muzzle energy up to 1,700 ft.-lbs. Presently, I am using a 110-grain Lehigh Defense Controlled Chaos as my defensive load, but Lehigh has just brought out some new 125-grain loads that deserve a further look. The projectile base of the Controlled Chaos supplies the proper penetration, and the front petals of the bullet break off and separate to increase the wound channel. If you want to put a target down, Lehigh Defense has a projectile that will do the job. Loads with a suitable cup-and-core bullet—or an FMJ bullet—are good choices for both target practice and training classes.
Properly tighten the buffer-tube extension to prevent problems • Drop-in triggers are simple to install and typically are upgrades over the standard mil-spec offerings • Next-level lower receivers, like the one used from Wilson Combat, have a bolt-catch lever that is secured via a threaded pin rather than a roll pin.
Items to Note When Building an AR-15
Most of the parts I have chosen are fabricated by Wilson Combat. There are other companies you can choose, but after building more ARs than I care to remember, I’ve come to expect nothing less than perfection in both fit and finish from Wilson Combat. Whatever parts you choose, however, a smart idea is to pick the majority of them from the same company. Each company designs its parts to fit adjoining parts that it also manufactures. If you purchase the upper receiver from one company and the lower from another company, which one will you call should you come across a problem?
Building the AR Upper Receiver
I have chosen to use a lightweight billet upper for my build to cut back on excessive weight. Wilson Combat removed material in areas where it is not needed. Plus, this receiver just looks good. I have also chosen to go with a two-tone finish on this rifle to assure instant recognition between it and my other ARs. Given a moment of crisis, the last thing I want to do is grab the wrong rifle.
The barrel is the one part that distinguishes the rifle as using the .300 HAMR cartridge. A 16-inch barrel with the “Recon” profile is considered Wilson Combat’s mid-weight model. It is light enough for everyday use, yet you will not see any deflection from overheating. Other quality barrel suppliers are Faxon Firearms, Proof Research and Shaw Barrels, to name a few.
Bravo Company’s low-profile gas block is usually slightly undersize, but a slip of fine grit emery cloth will remove just enough material to get a snug fit between the barrel and gas block. When using a Wilson Combat barrel, there is a dimple on the bottom of the barrel for the setscrew on the gas block to ensure proper indexing of the gas block.
A Wilson Combat 12.6-inch AR-15 M-Lok handguard provides more than ample room for attachments without interfering with your grip and protects the gas block and gas tube. The handguard has a continuous Picatinny rail at the 12-o’clock position to mate up with the upper receiver. There are another seven rows of M-Lok attachment slots spaced every 45 degrees running the length of the handguard.
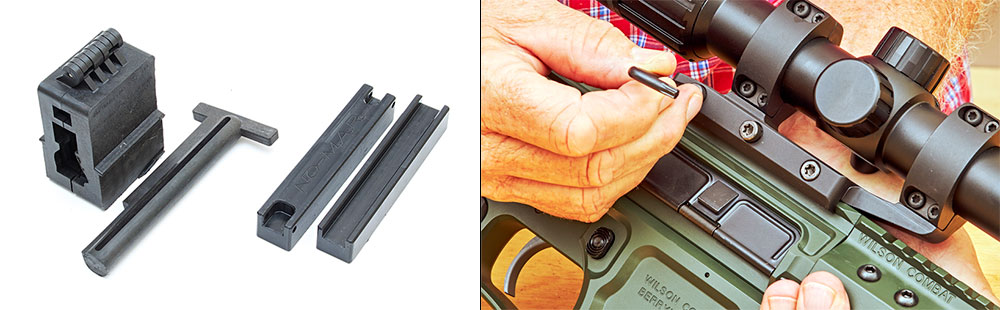
Some specialty tools are required to assemble an AR-15-style rifle, such as upper- and lower-receiver blocks • Having these dedicated tools can come in handy later, like when adding optics to your firearm.
Installing a BCM Gunfighter charging handle improves your grip, especially when a larger-objective scope is being used. A standard bolt-carrier group (BCG) can work without a problem, but for this build I am testing a non-lubed Wilson Combat BCG with a DLC coating. It has yet to cause any problems with function, with not a single failure to feed or eject even though it has not been lubricated. Cleaning this BCG only requires wiping it off.
To finish the upper receiver, a Q-Comp muzzle device and crush washer were added to the end of the barrel. The Q-Comp helps with recoil without significantly increasing noise. Depending on your intended use for the carbine, a quick-attach device for a suppressor such as SilencerCo’s ASR line might be worth investigating. At this point, the AR-15’s upper receiver is complete, which most believe is the hardest part of building an AR-15.
Building the AR Lower Assembly
The lower receiver is the one part that is regulated and must be transferred to your ownership by a licensed FFL dealer. In the eyes of the law, this one part is the “firearm.” I feel the Wilson Combat billet lower to be the perfect match for the company’s upper receiver.
To save time, I suggest you purchase a complete lower parts kit (LPK), such as those available from Rise Armament or the kit by CMMG I used in this build. These kits typically contain all the smaller parts to finish off the building of your lower receiver. Besides being a time-saver, CMMG’s parts are of excellent quality. The company also markets its own kit with or without the trigger group and pistol grip. These are two parts normally supplied in an LPK, but there is no use in paying for those two parts if you plan to use better options.
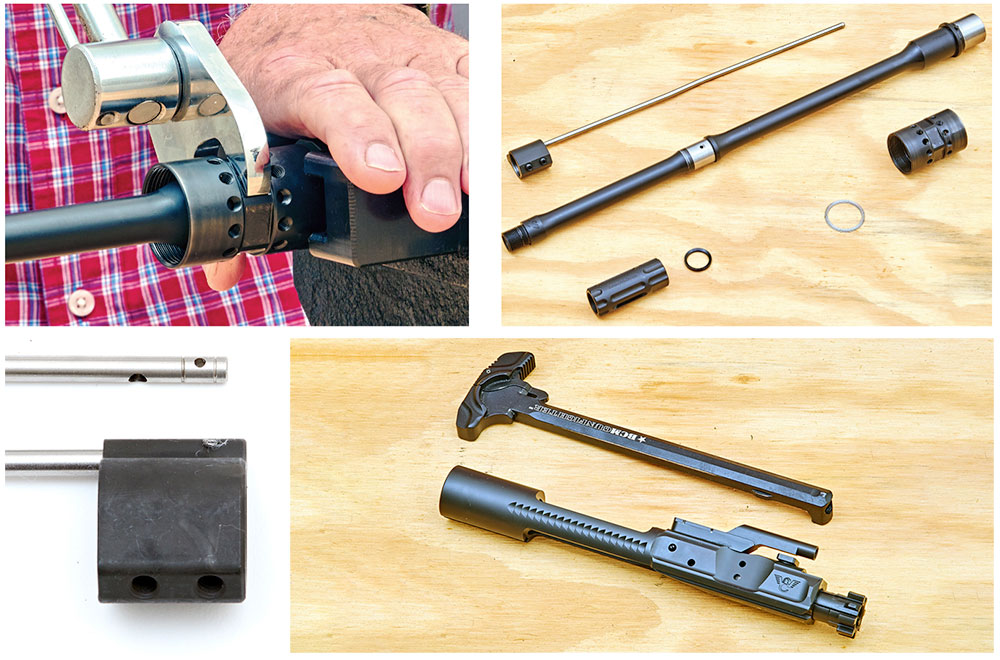
Properly clocking and tightening the barrel nut to the manufacturer’s suggested torque specification is critical when assembling the upper receiver • Take care in selection of the barrel for your build, as it arguably plays the most important role in accuracy • Aligning the gas tube with the gas block is straightforward, but extra attention should be paid to ensure nothing moves when securing the roll pin • Quality parts, like an ambidextrous charging handle and top-tier bolt-carrier group, may cost a little more, but are worth it to help minimize the chance of a malfunction.
The main reason not to use a standard trigger assembly is most mil-spec triggers provide a heavy and gritty trigger pull. Just the difference in feel between a standard trigger and a Wilson Combat TTU (Tactical Trigger Unit) is worth the extra cost. I have chosen a two-stage unit to give me the feeling of control over the moment of trigger break. When using a home-defense rifle, a good trigger will help you overcome the adrenaline surge that should be expected in critical situations. Excellent aftermarket triggers, both single- and two-stage, are also available from Rise Armament, Geissele, Timney and others.
It should be noted that the bolt-release retaining pin used in the lower assembly can be set aside. Wilson Combat has improved this function by threading the lower receiver and providing a threaded retaining pin. Aero Precision uses this same arrangement in its M4E1 line of lower receivers.
You may notice that I chose to use a Mission First Tactical EPG16V2 pistol grip. This grip has a 15-degree angle, making it more perpendicular, which allows the wrist to remain straight while firing. I have tried several buttstocks, but it always seems that I return to Magpul’s CTR stock. It is snag-proof, and the main adjustment release is protected from accidental release. The secondary release will take out any movement between the receiver extension and buttstock. Many options are available for the AR’s “furniture” from Magpul, B5 Systems Mission First Tactical and other suppliers.
Once you attach the upper and lower receivers with the pivot and takedown pins, you will have a complete AR-15 home-defense carbine.
Accessorize Your Rifle
Once your carbine is complete, it is time to add the finishing touches. You have a lot of space along the handguard to add whatever accessory you can imagine, but on a defensive firearm I would keep it as simple as possible. I recommend going with an LPVO (low-power variable optic) and a weaponlight. The last thing you need is for a useless add-on getting in your way at the wrong time. Many trainers recommend a sling in case you need to carry your rifle for any distance, or simply to provide support in the absence of an immediate threat.
Ideal optic choices for a home-defense carbine would be a red-dot sight or the aforementioned LPVO. Just for versatility I chose the latter, opting for a Burris RT-6 with 1-6X magnification. This scope checked all the boxes in my search for a useful optic. The true 1X setting, in combination with an illuminated reticle, gives you all the advantages of a red-dot sight. The illuminated portion of the reticle is a 2.25-mil circle with a .25-mil center dot. The subtensions of the reticle remain unlit so as not to distract you in a close-quarter critical situation. A simple, inexpensive and long-life CR2032 lithium battery provides the power for the reticle, which has 10 intensity levels on a left-side rotary dial, and there is an “Off” position between each setting. This way, you can adjust to your desired level and must make only one click to turn it on or off. The increased main tube size (30 mm) allows you to shoot with both eyes open at 1X for total awareness in an expanded field-of-view. The ability to go up to a 6X magnification expands the usefulness of this scope to extended ranges.
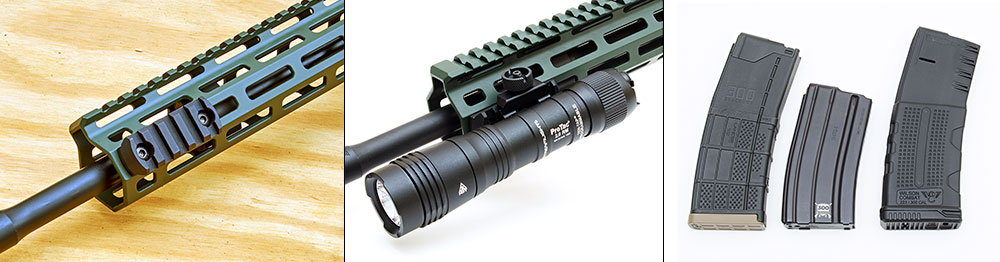
Using a handguard with multiple attachment points (M-Lok or other system) allows accessories to be added wherever needed • One such accessory is a simple, robust weaponlight • Numerous styles of magazine are available for your carbine, in metal, polymer or a combination of both. Be sure to test any potential defensive magazines thoroughly.
To hold the scope in place I chose a 30 mm Omni V cantilever scope mount by Wilson Combat. The mount locates the scope at an ideal height and provides plenty of room to adjust for proper eye relief. The combination of three integral recoil lugs and three steel mounting cross bolts makes sure the scope will stay in place even under the heaviest recoil. Quality options abound in this arena, including examples from Warne and Leupold.
An accessory I recommend for a defensive rifle is a high-power weaponlight. Low light just seems to draw out the troublemakers, and a proper identification is critical so the home defender is absolutely certain they have correctly identified the threat before pulling the trigger.
Placement of the weaponlight should be intuitive, so that your support hand can activate the light without additional movement that could bring the carbine off target at a critical moment. Choosing a handguard with multiple points of attachment, whether via M-Lok, KeyMod, Picatinny rail or other method, will allow you to experiment with various options for light placement. Again, the goal is to be able to activate the light without needing to move the support hand.
Another accessory that can be added to a home-defense carbine is a sling. Should you need to lower the carbine, a sling will allow it to remain connected to you; if you stage both a holstered handgun and a rifle, the sling will allow you to safely lower the carbine and transition to your pistol should you need to have a hand free to call 911, collect a family member or for any other reason. Quality slings can be found from Magpul, Blue Force Gear, SB Tactical and other manufacturers.
The result of this project should be a defensive carbine that is powerful enough to handle anything that comes through your door, day or night. Since you’ve assembled it yourself, you are intimately familiar with how everything works (and the pride of ownership and accomplishment that come with it, too) Now all that is left is for you get some quality training with your custom carbine and then take it to the range to practice.
Read the full article here